How to Repair a Toilet Leaking at Base: The Complete Guide
The dreaded feeling of damp socks against the bathroom floor can annoy anyone. This mostly happens when there’s a leak in the bathroom. To be precise, a leaky toilet base. Now, a leaking toilet base isn’t just unpleasant; it can lead to serious water damage and mold growth. Yes, it’s that serious. Wait, before you call in the professionals, hear us out! Learning how to repair a toilet leaking at base is often a DIY project you can tackle yourself with the right knowledge and tools.
This guide will equip you with the information you need to diagnose and conquer a leaky toilet base. We’ll walk you through identifying the issues, and teach you how to repair a toilet leaking at base, step-by-step.
Identifying the Signs Behind Your Leaky Toilet Base
Loose Tee Bolts:
These two bolts, also known as closet bolts, hold the toilet securely to the floor. Over time, they can become loose, causing the toilet to rock. This rocking motion can break the seal created by the wax ring (more on that later) between the toilet and the drainpipe, allowing water to seep through and cause a leak at the base of the toilet.
Worn-Out Wax Ring:
The wax ring forms a watertight seal between the toilet flange (the pipe outlet on the floor) and the toilet base. Made of wax, this ring deteriorates with age and constant exposure to water. A worn-out wax ring loses its sealing ability, leading to the need for a leaking toilet base repair.
Uneven Flooring:
Imagine your toilet sitting on a seesaw. That’s what happens when you have uneven flooring beneath the toilet base. This unevenness can put stress on the wax ring, causing it to break or become misaligned, ultimately resulting in a leak at the base of the toilet.
Loose Water Supply Line:
The water supply line, a flexible hose, connects the toilet tank to the main water supply in your house. A loose connection at this point can mimic a leak at the base of the toilet. The water might not be visibly leaking from the connection itself, but it can travel down the hose and drip from the base, creating the illusion of a leak originating from the toilet itself.
Condensation:
In a humid bathroom environment, the cold water inside the toilet tank can cause condensation to form on the exterior of the tank. This condensation can then drip down the toilet and pool at the base, mimicking a leak. This isn’t a true leak in the sense that there’s no break in the plumbing system, but it can certainly be mistaken for one.
Quick Tip to Identify Condensation: To check for condensation, simply wipe down the exterior of the toilet with a dry cloth. If the dampness disappears quickly, it’s likely condensation and not a true leak.
What Tools Are Required to Repair a Leaking Toilet Base Repair?
Once you’ve identified the reason behind the leak, you’ll need to gather tools. Here’s a list of the tools and supplies you might need, depending on the specific cause of the leak:
Tools:
Wrench (adjustable or open-ended): This wrench will be used to tighten or loosen the tee bolts that hold the toilet to the floor.
Screwdriver (flat-head and Phillips): Depending on your toilet model, you might need a screwdriver to remove certain parts during the repair process. Having both flat-head and Phillips head options on hand covers all possibilities.
Putty knife: This handy tool will be used to remove any old wax residue from the downpipe flange before installing a new wax ring as part of your repair.
Toilet repair kit:
These kits typically include a new wax ring, washers, and gaskets, offering a one-stop shop for many common leaky toilet base repair needs. If you prefer not to purchase a kit, you can buy the individual parts separately.
Hacksaw (optional): This tool comes in handy if the tee bolts holding the toilet in place are badly corroded or stripped and cannot be loosened with a wrench. The hacksaw allows you to carefully cut through the bolts for removal.
Safety Gear:
Rubber gloves: Wearing rubber gloves protects your hands from any mess or sharp edges you might encounter while working on the repair.
Cleaning and Finishing Touches:
Bathroom cleaner: Since you’ll be working around the base of the toilet, it’s a good idea to have a good quality cleaner.
A Step-by-Step Guide to How to Repair a Toilet Leaking at Base
Once you’ve identified the leak source and have your tools ready, you can restore peace to your bathroom!
Here’s a step-by-step guide on how to do the repairs:
1. Turn Off the Water Supply:
Locate the shut-off valve near the base of the toilet. This valve is typically a handle that turns clockwise to close and counterclockwise to open. Turn the valve clockwise until it stops completely, shutting off the water supply to the toilet.
2. Flush and Drain:
With the water supply off, flush the toilet to remove as much water as possible from the tank and bowl. Use a sponge to soak up any remaining water in the bowl to minimize the mess during the process.
3. Disconnect the Water Supply Line:
Now that the tank is empty, locate the water supply line connecting the toilet tank to the wall. This line is usually a flexible hose with a nut or coupling at the connection point. Use your wrench to loosen and disconnect the water supply line from the fill valve at the bottom of the tank.
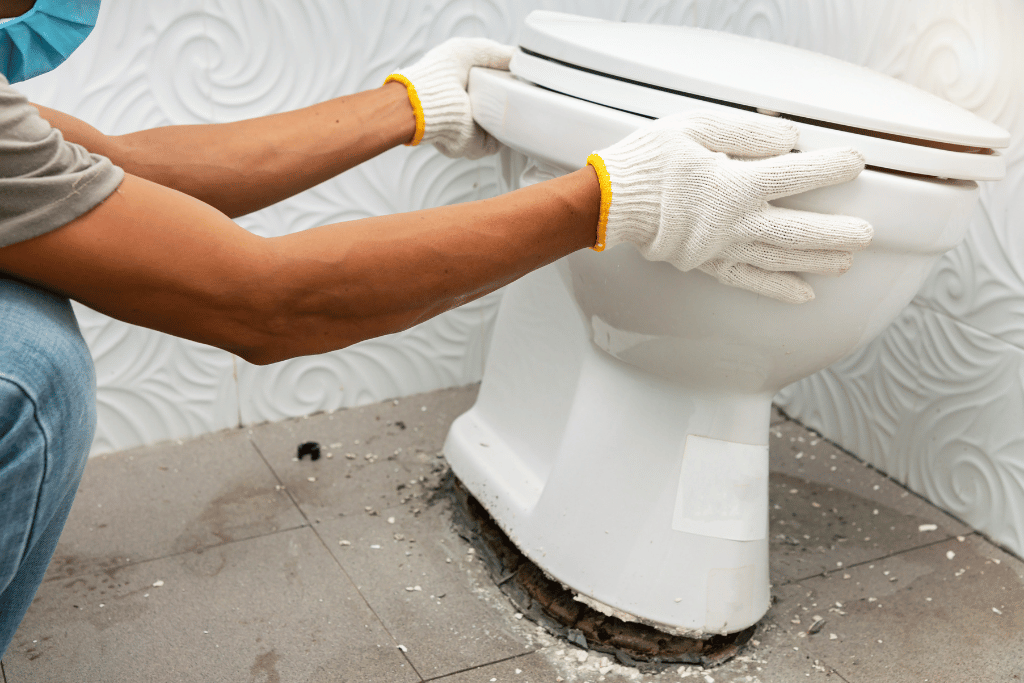
4. Unbolt the Toilet (with a friend!):
This step requires an extra pair of hands for safety. Carefully lift the toilet straight up and off the floor flange. Be sure to lift it straight up to avoid putting any unnecessary stress on the remaining plumbing connections. Set the toilet aside on a protected surface, like a folded towel, to prevent damage.
Now that the toilet is out of the way, you can address the specific cause of the leak:
Replacing a Worn-Out Wax Ring:
If the culprit is a worn-out wax ring, use the putty knife to remove any old wax residue from the drain pipe flange. Ensure the flange surface is clean and free of debris before installing the new wax ring. Most wax rings come with a plastic cone pointing downwards. Position the new wax ring on the flange with the cone pointing down into the drainpipe, ensuring the tee bolt holes in the wax ring align with the holes in the flange.
Tightening Loose Tee Bolts:
If loose tee bolts are the reason for the leak, simply reinstall the toilet back onto the flange, aligning the tee bolt holes with the corresponding holes in the wax ring. Screw the tee bolts back in place and tighten them securely with your wrench. Be careful not to overtighten the bolts, as this can crack the porcelain toilet base.
Addressing Uneven Flooring (Optional):
If uneven flooring is the underlying cause of the leak, you’ll need to address the unevenness before reinstalling the toilet. This might involve adding shims under the toilet base to create a level surface or potentially repairing the uneven floor itself. If this step seems beyond your comfort level, consulting a professional plumber is recommended. If you’re in Miami, JMK plumbing can help you. We cater to almost every plumbing issue, including this one. Get in touch with us to get your plumbing work done by experts.
Once you’ve addressed the specific cause of the leak, you can proceed with reinstalling the toilet:
5. Reposition the Toilet:
Carefully lower the toilet back onto the flange, ensuring the tee bolts fit through the holes in the base and the wax ring is compressed between the toilet and the flange.
6. Re-tighten the Tee Bolts:
Use the wrench to tighten the tee bolts snugly, but be careful not to overtighten and crack the porcelain.
7. Reconnect the Water Supply Line:
Reattach the water supply line to the fill valve and tighten the connection securely with your wrench.
8. Turn On the Water Supply Slowly:
Slowly turn the shut-off valve counterclockwise to restore water supply to the toilet. Open the valve gradually and watch for any leaks around the base of the toilet or at the connection point of the water supply line.
9. Caulk the Base:
Apply a bead of caulk around the base of the toilet where it meets the floor. This provides an extra layer of protection against future leaks. Use a caulking gun to ensure a smooth and even application.
10. Test and Celebrate!
Once you’ve completed all the steps and caulked the base (if desired), flush the toilet and check for leaks. If everything seems dry and there are no leaks, you’ve successfully followed the steps on how to repair a toilet leaking at the base project! Pat yourself on the back for a job well done.
Note: Safety first! If you’re uncomfortable with any step in the process or unsure about tackling the repair yourself, don’t hesitate to call a qualified plumbing company. There’s no shame in seeking professional help for a plumbing issue, especially if it’s beyond your comfort level.
We, at JMK plumbing, are a Miami-based plumbing company that has satisfied thousands of customers. For any plumbing work, get in touch with us by dialing 786-833-6750 or visit our website.