How to Repair a Broken Toilet Flange: A DIY Guide for Homeowners
Is your toilet a bit of a menace, wobbling precariously when you sit on it? Or maybe you’ve noticed a puddle forming around the base, a sure sign of something’s not right. These are obvious signs of a broken toilet flange, the crucial component that anchors your toilet to the floor and prevents sewage leaks.
Worry not, tackling a broken toilet flange can be a manageable DIY project with the right knowledge and tools. This guide will walk you through the entire process, from assessing the damage to reinstalling your toilet securely. So, stay with us till the end to know how to repair a broken toilet flange.
How to Know If It’s Really the Toilet Flange That’s Broken?
The below signs will confirm if it’s your toilet flange that’s broken or not:
- Leaking Around the Base: A puddle of water around the base of your toilet is a clear indicator that the seal between the toilet and the flange is compromised.
- Toilet Rocking or Feeling Loose: If your toilet feels wobbly or rocks when you sit down, it’s a strong possibility that the flange is cracked or broken, allowing the toilet to shift.
- Cracks or Breaks in the Visible Flange Material: Take a peek at the base of your toilet where it meets the floor. If you see visible cracks or chips in the flange material itself, that’s a definite sign it’s broken.
Types of Flange Breaks: Understanding the Repair Approach
Not all broken flanges are created equal. The severity and type of break will determine the repair approach you need to take:
Minor Cracks/Chips: If the damage is limited to small hairline cracks or superficial chips in the upper flange material, a toilet repair ring might be enough to reinforce it and create a secure seal. These rings typically fit over the existing flange and fasten to the subfloor, providing additional stability and a watertight seal.
Broken Flange Bolts: The closet bolts, the two bolts that hold the toilet down to the flange, can become loose, corroded, or even snap over time. This can cause the toilet to wobble or rock slightly. Luckily, replacing the closet bolts is a relatively simple fix. You’ll just need to purchase new bolts of the appropriate size and material (usually brass) to ensure durability.
Deteriorated or Corroded Flange: Over a long lifespan, exposure to moisture, improper installation, or simply the passage of time can cause the entire flange to deteriorate or corrode. In such cases, a complete replacement of the toilet flange is necessary. This can be a more involved process, especially if the flange is cemented into a cast-iron waste pipe. However, with the right tools and this guide, you can tackle this repair yourself.
Understanding the type of flange break you’re dealing with will help you choose the most appropriate and efficient repair method on how to repair a broken toilet flange.
Before Going For The Repairs, Ensure Your Safety
Safety First: Do this before you begin the repairs!
Follow the steps to ensure your safety:
- Turn Off the Water Supply: The first and most crucial step is to shut off the water supply to your toilet. Locate the shut-off valve near the base of the toilet and turn it clockwise until it stops.
- Don the Right Gear: Protect your hands with gloves and your eyes with safety glasses. Plumbing work can involve sharp edges and potential splashes, so it’s best to be cautious.
- Use Caution with Tools: Be mindful when using tools like hammers and utility knives. Always cut away from yourself and make sure your work area is clear.
- Mind the Sewage: There’s a chance of sewage backup when you remove the toilet. To prevent a mess, consider plugging the drain or placing a bucket underneath the opening.
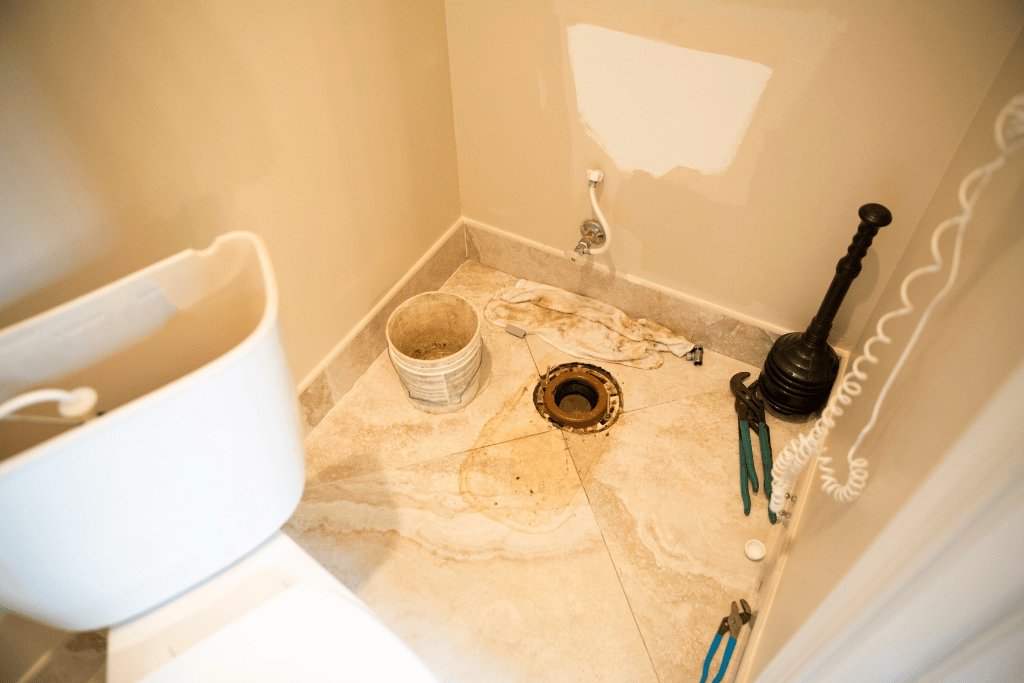
Steps on How to Repair a Broken Toilet Flange
How to Repair a Minor Crack/Chip with a Toilet Repair Ring (1st mention)
If your inspection revealed minor cracks or chips in the flange, a toilet repair ring is what you need, Here’s how to repair a broken toilet flange using a repair ring:
- Turn off the Water Supply and Disconnect the Toilet: Safety first! Locate the shut-off valve near the base of the toilet and turn it clockwise until it stops to shut off the water supply. Disconnect the water supply line from the toilet tank. Now, carefully disconnect the tank bolts and lift the tank straight up and away. Place it aside in a safe location.
- Unscrew the Closet Bolts and Remove the Toilet: Using a wrench or socket set, loosen and unscrew the closet bolts that secure the toilet to the flange. Be cautious, as any remaining water in the bowl may spill when you remove the toilet. Consider placing a towel underneath the toilet base to catch any drips.
Carefully lift the toilet straight up and away from the flange, setting it aside.
- Clean and Prepare the Flange Area: Thoroughly clean and dry the area around the flange, removing any dirt, debris, or old wax ring residue. A clean and dry surface ensures a good bond with the repair ring. You can use a rag, some cleaning solution, and a putty knife to scrape away any stubborn residue.
- Remove Loose Flange Fragments (if applicable): If there are any loose or broken pieces of the flange itself, carefully remove them using a utility knife or putty knife. Be mindful not to damage the surrounding floor or waste pipe.
- Apply Silicone Sealant: Apply a generous bead of 100% silicone sealant to the top of the existing flange. Make sure to get the sealant into any cracks or crevices for a watertight seal.
- Position and Secure the Repair Ring: Place the toilet repair ring over the flange, aligning the holes for the closet bolts. Following the manufacturer’s instructions specific to your chosen repair ring, secure it to the subfloor with the provided screws and anchors. Tighten them firmly, but not excessively, to avoid damaging the flange or subfloor.
- Let the Silicone Cure: This is crucial! Allow the silicone sealant to cure completely before proceeding. Refer to the product instructions for the recommended curing time. Skipping this step could compromise the seal and lead to future leaks.
How to Repair a Toilet Flange if the Closet Bolts Are Damaged
Replacing broken closet bolts is a relatively simple fix. Here’s what you’ll need to do:
- Cut Off the Supply: Turn off the water supply, disconnect the toilet tank and tank bolts, and remove the toilet from the flange (as described previously).
- Unscrew the Broken Closet Bolts: Using a wrench or socket set, remove the broken closet bolts from the flange.
- Clean and Inspect the Flange: Clean the flange area and inspect it for any cracks or damage. If the flange itself seems compromised, you’ll need to replace it following steps in section B. Otherwise, proceed with replacing the bolts.
- Install New Closet Bolts: Insert the new closet bolts (usually made of brass for durability) through the holes in the flange and screw on the nuts from the bottom of the toilet. Tighten them snugly, but be careful not to over-tighten and crack the flange.
- Reinstall the Toilet: Carefully lower the toilet bowl onto the flange, aligning the holes with the new closet bolts. Place the tank back on the bowl, reconnect the tank bolts and water supply line, and restore water supply. Tighten everything securely, but not excessively.
- Check for Leaks: Turn on the water supply and check for any leaks around the base of the toilet or at the connection points. If you see any leaks, carefully tighten the connections or consult a professional plumber if necessary.
Remember, if you’re unsure about any part of the process, it’s always best to consult a qualified plumber in Miami. They have the expertise and experience to handle more complex repairs and ensure your toilet is properly secured and functioning correctly.
How to Repair a Toilet Flange if the Waste Pipe is Damaged:
The replacement process for a broken flange will vary depending on the type of waste pipe you have. Here’s a breakdown for the two most common scenarios:
Replacing a Flange with a Cast Iron Waste Pipe:
Disconnect and Remove Toilet: Turn off the water supply, disconnect the toilet tank and tank bolts, and carefully remove the toilet from the flange.
Carefully Remove the Old Flange: Cast iron flanges are typically cemented into the waste pipe. You’ll need a hammer and chisel to carefully break the flange around the base. Be cautious not to damage the waste pipe itself. Wear safety glasses and work slowly to avoid flying debris.
Clean and Prep the Waste Pipe Opening: Once the old flange is removed, thoroughly clean the waste pipe opening to remove any debris or cement residue. You can use a wire brush or sandpaper for this purpose.
Install the New Flange: There are two main options for installing a new flange with a cast iron waste pipe:
- Mechanical Flange: These use compression rings and wedges to secure the flange to the inside of the waste pipe. Follow the manufacturer’s instructions for specific installation steps.
- Solvent Weld Flange: These require applying solvent cement to the waste pipe opening and the new flange for a permanent bond. Ensure proper ventilation when using solvent cement and follow safety instructions carefully.
Secure the Flange: Tighten any screws or wedges according to the chosen flange type to secure it firmly in place. Allow any solvent cement to cure completely before proceeding (if applicable).
Reinstall the Toilet: Carefully lower the toilet bowl onto the flange, aligning the holes with the closet bolts. Reinstall the tank, reconnect everything, and check for leaks once the water supply is restored.
Replacing a Flange with a PVC/ABS Waste Pipe:
Safety Gear Up: Similar to cast iron, wear safety glasses, gloves, and a dust mask for protection.
Disconnect and Remove Toilet : Turn off the water supply, disconnect the toilet tank and tank bolts, and carefully remove the toilet from the flange.
Cut and Remove the Old Flange: Since PVC/ABS pipes are typically glued together, you’ll need a saw to cut the pipe below the flange. Make sure to cut straight and clean. Then, carefully remove the old flange and any remaining PVC/ABS section from the waste pipe.
Clean and Prep the Waste Pipe Opening: Thoroughly clean the waste pipe opening to remove any debris or old cement residue. You can use a wire brush or sandpaper for this purpose.
Install the New Flange: New flanges for PVC/ABS pipes typically use a solvent weld connection. Apply solvent cement to the waste pipe opening and the new flange, following the manufacturer’s instructions. Ensure proper ventilation and wear gloves and safety glasses. Quickly insert the flange into the opening and hold it firmly for the recommended time (according to the cement).
Allow Solvent Cement to Cure Completely: This is crucial for a watertight seal. Refer to the solvent cement’s instructions for the recommended curing time before proceeding.
Reinstall the Toilet: Carefully lower the toilet bowl onto the flange, aligning the holes with the closet bolts. Reinstall the tank, reconnect everything, and check for leaks once the water supply is restored.
These are detailed steps for replacing a broken toilet flange depending on the type of waste pipe system in your home. Remember, if you encounter any unexpected issues or feel uncomfortable with any part of the process, don’t hesitate to call a professional plumber.
Some Useful Tips to Consider For a Successful Toilet Flange Repair
- Flange Bolts with Built-in Washers: When replacing closet bolts, consider using bolts with built-in washers. These washers create a tighter seal between the toilet and the flange, reducing the risk of leaks.
- Leveling the Toilet Flange: If your subfloor is uneven, it can cause the toilet to rock even after a proper repair. To prevent this, use shims (thin wedges of plastic or metal) to level the toilet flange before reinstalling the toilet. Place the shims under the flange where needed to create a stable and even base.
- Extensive Floor Damage: In some cases, you might encounter more extensive damage than a cracked flange. If the subfloor around the flange is rotten or severely damaged, a more complex repair might be necessary. This could involve replacing the subfloor section or reinforcing it with additional support beams.
In such situations, it’s best to consult a qualified plumber to assess the damage and recommend the most appropriate course of action. A licensed plumber has the expertise and experience to handle complex repairs and ensure your toilet is properly secured and functioning flawlessly for years to come.
Final Words
This guide has equipped you with the information on how to repair a broken toilet flange. Now, you can do it yourself!
Remember, the key to a successful repair is following the steps carefully, using the proper materials, and prioritizing safety throughout the process.
However, there’s no shame in calling in a professional! If you’re unsure about any steps, encounter unexpected complications, or suspect more extensive damage beyond the scope of this guide, don’t hesitate to consult a qualified plumbing company like JMK plumbing.
Our expertise can ensure a proper repair, prevent potential future leaks, and give you peace of mind knowing your toilet is secure and functioning flawlessly for years to come.